

VBA (Visual Basic for Applications) is the programming language built into every copy of Excel. You can use it to automate the kind of work you find yourself doing the same way, every single time: formatting a monthly report, copying data between sheets, applying consistent number formats, sending rows to different tabs based on a value. None of that requires a programming background — the Macro Recorder writes the code for you while you click through Excel normally, and understanding even a little of that code is enough to make the recorded macros genuinely reusable.
This book is built around one running example: a monthly sales report that arrives as a raw export and needs to be cleaned up before it can be sent. By the end you’ll have a macro that formats headers, applies number formats, adds a totals row, and confirms it finished — all in one keystroke. Each chapter adds one layer to that same file, so the code you’re reading is always familiar.
You don’t need any prior programming experience. You do need to be comfortable with basic Excel navigation and familiar with at least one formula — the concepts here build on that foundation, not on code.
What Is VBA and When Should You Use It?
VBA lives inside Excel’s Macro Recorder and a built-in code editor called the VBA Editor. Every action you take in Excel — selecting a cell, applying a format, entering a value — can be expressed as a line of VBA code, and the Recorder translates your clicks into that code automatically.
Reach for a macro when:
- You repeat the exact same sequence of steps on different files or sheets — formatting headers, sorting, copying, pasting as values.
- A task involves a condition you’d have to check manually (“if this cell says Pending, move the row to the Pending tab”).
- You’re doing something Excel can’t do with a formula alone, like creating or renaming sheets, or looping through a variable number of rows.
Stick with formulas and PivotTables when:
- The goal is a calculated result that should stay live — formulas recalculate automatically; a macro only runs when you tell it to.
- The logic is straightforward and someone else needs to audit or edit the workbook — a formula in a cell is much more transparent than code in a module.
The cleanest workbooks usually combine both: formulas and PivotTables for live calculations, macros for the repetitive setup work that happens before the analysis begins.
Recording Your First Macro
The Macro Recorder is on the Developer tab, which is hidden by default. To show it: File → Options → Customize Ribbon, check the box next to Developer in the right-hand list, and click OK. The Developer tab appears between View and Help.
Click Developer → Record Macro. Give the macro a name (no spaces — use underscores: Format_Headers), optionally assign a shortcut key like Ctrl+Shift+F, choose This Workbook for where to store it, and click OK. Excel is now recording every action you take.
For the running example, do these steps while the Recorder is on:
- Click cell A1.
- Select the header row (A1:G1).
- Apply bold (Ctrl+B), a dark background fill, and white font color.
- Click Developer → Stop Recording.
That’s a macro. You recorded it by clicking through Excel the normal way — no code written at all.
Running and Managing Macros
Press Alt+F8 to open the Macro dialog. Your macro appears by name; select it and click Run. If you assigned a shortcut key during recording, that works too — pressing Ctrl+Shift+F anywhere in the workbook runs it immediately.
Two things to check before recording anything you plan to keep:
Absolute vs. relative references. By default, the Recorder locks onto the exact cells you clicked. That means running Format_Headers on a different sheet still tries to format A1:G1 regardless of where you’ve selected. If you want the macro to work relative to whichever cell is currently selected, click Use Relative References on the Developer tab before recording — it stays on until you click it again.
Save as .xlsm. Macros are not saved in a standard .xlsx file. The first time you save a workbook that contains macros, Excel will warn you and offer to save as an Excel Macro-Enabled Workbook (.xlsm). Always choose .xlsm or your macros will be stripped out on save. The file behaves identically to .xlsx otherwise.
Understanding the VBA Editor
Press Alt+F11 to open the Visual Basic Editor (VBE). It’s a separate window that sits alongside Excel — you can switch between them freely with Alt+Tab or Alt+F11.
Three panels matter for day-to-day macro work:
- Project Explorer (top left) — a tree of every open workbook and the code objects inside it: Sheets, ThisWorkbook, and any Modules. Modules are where standalone macros live.
- Properties Window (bottom left) — shows settings for whatever’s selected in the Project Explorer. Rarely needed for basic macro work.
- Code Window (right) — where the actual VBA code appears and where you’ll do your editing.
Double-click Module1 in the Project Explorer to open the code window for it. Your recorded macro will be there.
Reading and Editing Recorded Code
Open Module1 and you’ll see something like this:
Sub Format_Headers()
'
' Format_Headers Macro
'
    Range("A1:G1").Select
    Selection.Font.Bold = True
    With Selection.Interior
        .Pattern = xlSolid
        .Color = RGB(31, 73, 125)
    End With
    With Selection.Font
        .Color = RGB(255, 255, 255)
        .Bold = True
    End With
End Sub
Reading from top to bottom: Sub marks the start of a macro (short for subroutine) and End Sub marks the end. Everything between those two lines is what runs. The lines starting with ' are comments — Excel ignores them completely. Range("A1:G1").Select selects that range. Selection.Font.Bold = True applies bold. The With...End With block applies multiple properties to the same object without repeating its name on every line.
The Recorder often adds extra .Select calls that aren’t needed. You can simplify by acting on the Range directly instead of selecting it first:
Sub Format_Headers()
    With Range("A1:G1")
        .Font.Bold = True
        .Font.Color = RGB(255, 255, 255)
        .Interior.Color = RGB(31, 73, 125)
    End With
End Sub
This version does the same thing in fewer lines. Removing unnecessary .Select calls is the single most useful edit you can make to recorded code — it runs faster and reads clearly.
Variables, Ranges, and Loops
Most useful macros need to work on a range that isn’t always the same size. The key tools for that are variables and loops.
Variables store values you want to use more than once. Declare them with Dim at the top of the Sub:
Dim lastRow As Long
Dim reportTitle As String
Dim totalAmount As Double
Long holds whole numbers (row counts, column indices). String holds text. Double holds numbers with decimal places.
Ranges can be defined in two ways. Range("A1:G1") uses the cell address as a string — simple and readable. Cells(1, 1) uses row and column numbers — useful when the row or column is stored in a variable:
Dim lastRow As Long
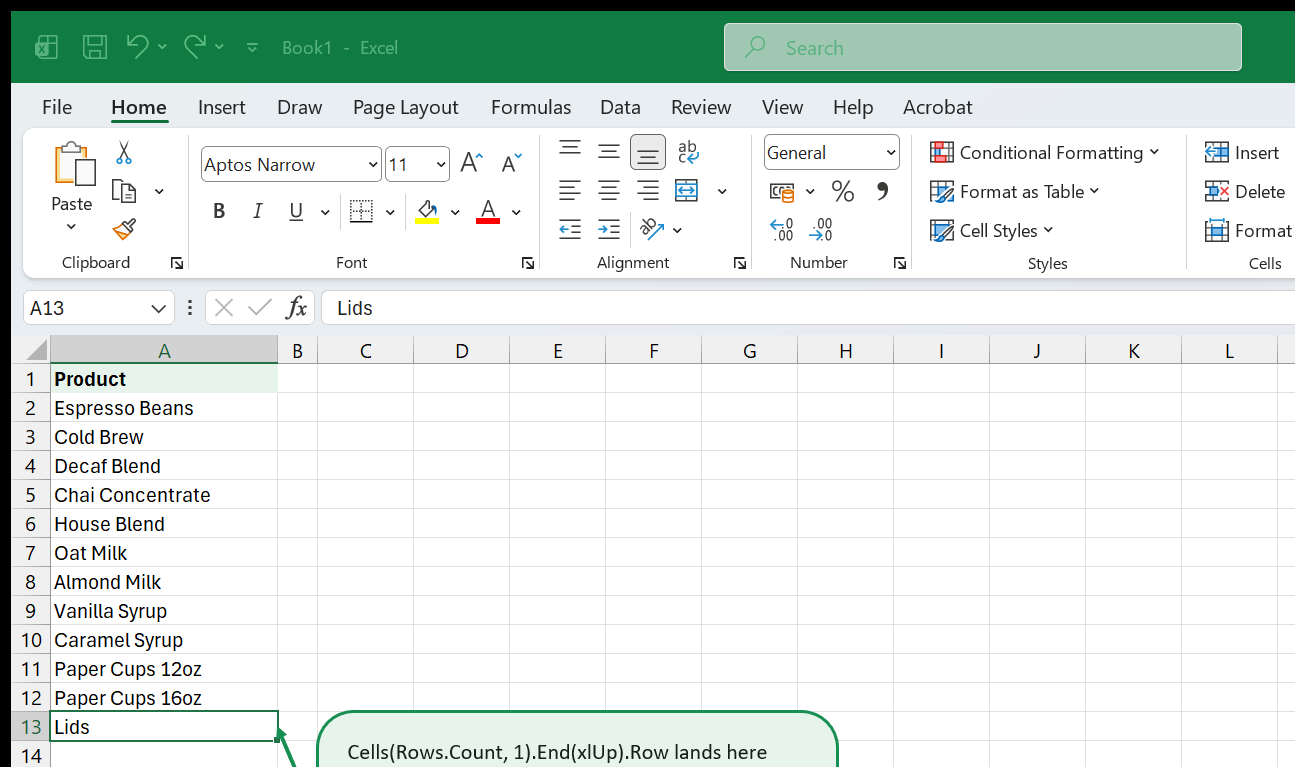
lastRow = Cells(Rows.Count, 1).End(xlUp).Row
Cells(Rows.Count, 1) starts at the very last row of column A. .End(xlUp) jumps up to the last non-empty cell — the same as pressing Ctrl+Up from the bottom of a column. .Row returns its row number as a Long. This pattern is the standard way to find the last used row in a column without hardcoding a number.
For Each loops visit every cell in a range:
Dim cell As Range
For Each cell In Range("A2:A50")
    If cell.Value = "Pending" Then
        cell.Font.Color = RGB(255, 0, 0)
    End If
Next cell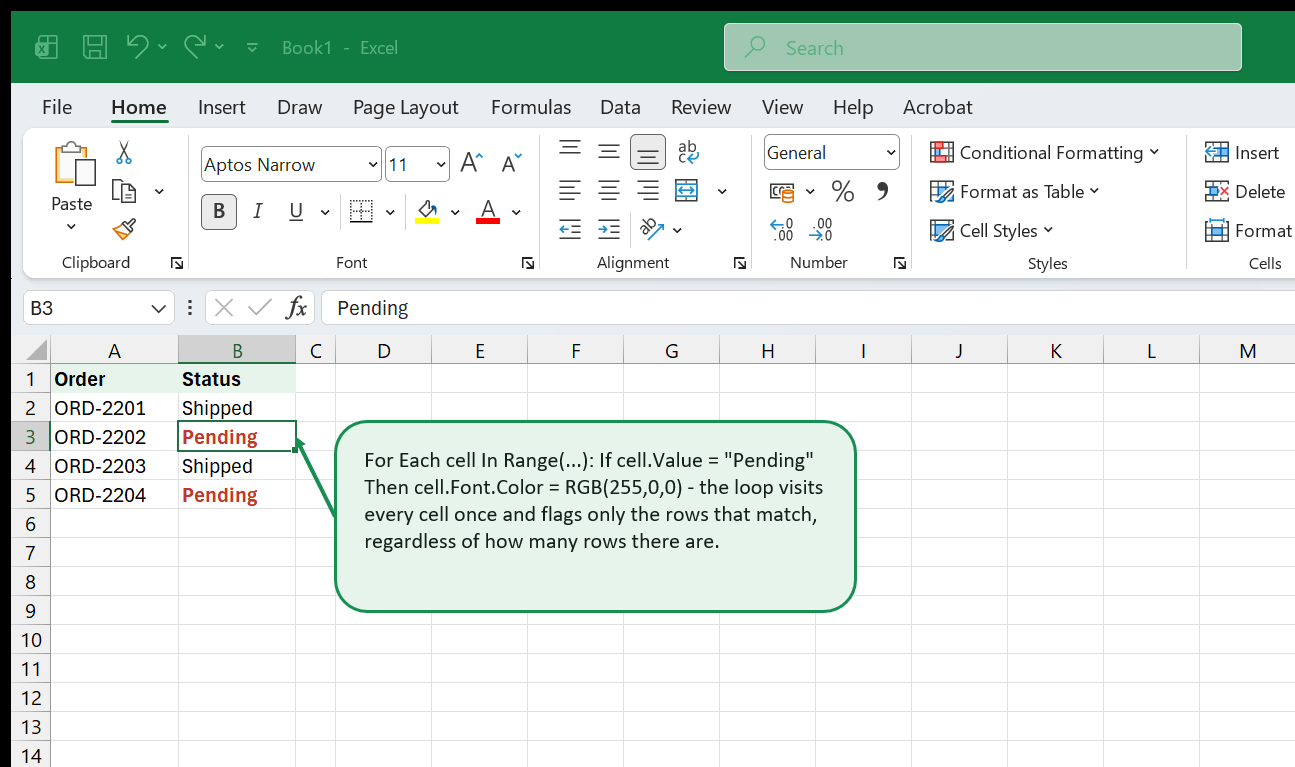
For…Next loops run a fixed number of times, useful when you know a count:
Dim i As Long
For i = 2 To lastRow
    Cells(i, 7).Value = Cells(i, 5).Value * Cells(i, 6).Value
Next i
This example fills column G from row 2 to lastRow with the product of columns E and F — the equivalent of dragging a formula down, but in code.
Simple Message Boxes and Input Dialogs
Two built-in VBA functions handle basic user interaction without building a custom form.
MsgBox displays a message and optionally asks a yes/no question:
MsgBox "Report formatted successfully."

Dim answer As Integer
answer = MsgBox("Apply formatting to this sheet?", vbYesNo)
If answer = vbYes Then
    Call Format_Headers
End If
vbYesNo makes the dialog show Yes and No buttons. The function returns vbYes or vbNo depending on which the user clicks.
InputBox displays a prompt and returns whatever the user types:
Dim reportMonth As String
reportMonth = InputBox("Enter the report month (e.g. July 2026):")
If reportMonth = "" Then Exit Sub
Range("A1").Value = reportMonth & " Sales Report"
The If reportMonth = "" check handles the case where the user clicks Cancel — InputBox returns an empty string on cancel, so checking for it before using the value prevents writing a blank cell.
Real-World Automation Patterns
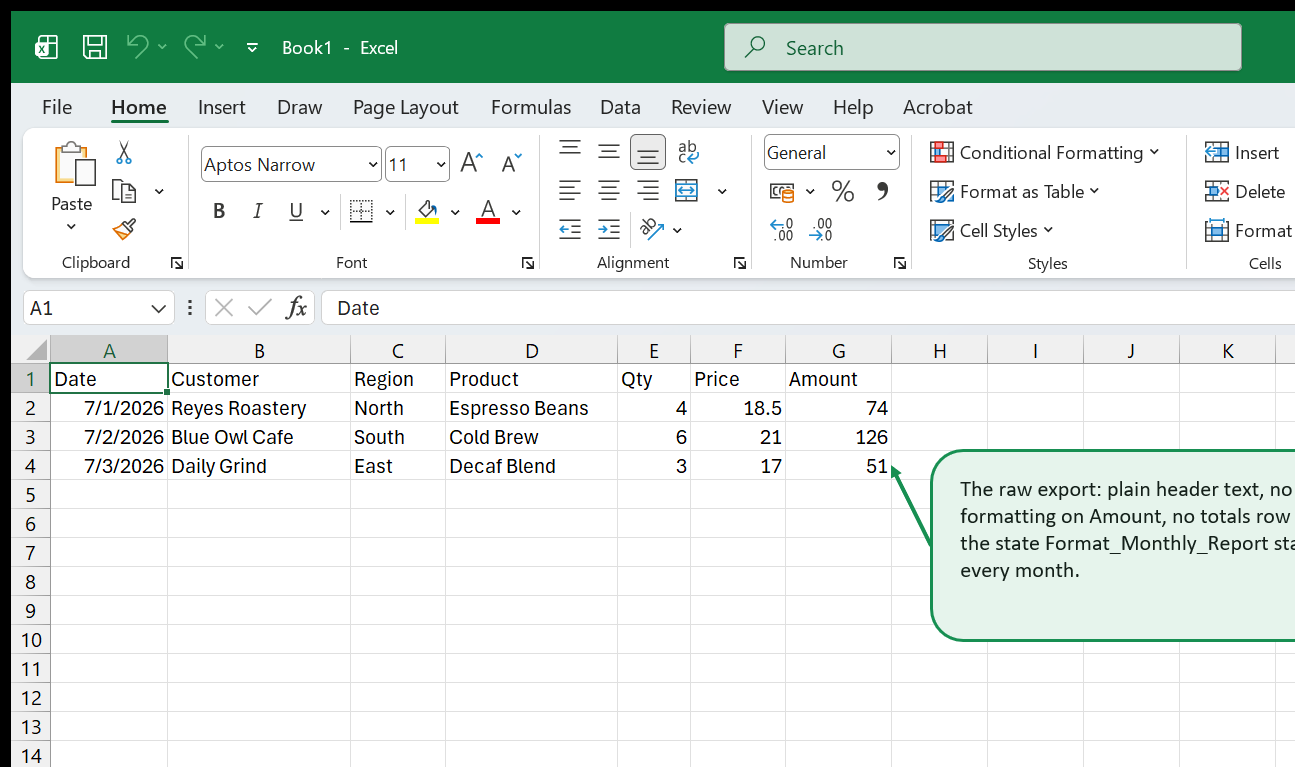
This chapter builds the complete monthly report macro from the running example. The raw export arrives with plain data — no header formatting, no number formats on the Amount column, no totals row. The macro applies all three in one run.
Sub Format_Monthly_Report()

    Dim ws As Worksheet
    Dim lastRow As Long
    Dim reportMonth As String

    ' Prompt for the report month
    reportMonth = InputBox("Enter the report month (e.g. July 2026):")
    If reportMonth = "" Then Exit Sub

    Set ws = ActiveSheet
    lastRow = ws.Cells(ws.Rows.Count, 1).End(xlUp).Row

    ' Set the title in A1
    ws.Range("A1").Value = reportMonth & " — Monthly Sales Report"

    ' Format the header row (row 2 in this export)
    With ws.Range("A2:G2")
        .Font.Bold = True
        .Font.Color = RGB(255, 255, 255)
        .Interior.Color = RGB(31, 73, 125)
    End With

    ' Apply currency format to the Amount column (column G)
    ws.Range("G3:G" & lastRow).NumberFormat = "$#,##0.00"

    ' Add a totals row
    lastRow = lastRow + 1
    ws.Cells(lastRow, 1).Value = "Total"
    ws.Cells(lastRow, 1).Font.Bold = True
    ws.Cells(lastRow, 7).Formula = "=SUM(G3:G" & (lastRow - 1) & ")"
    ws.Cells(lastRow, 7).Font.Bold = True
    ws.Cells(lastRow, 7).NumberFormat = "$#,##0.00"

    ' Autofit columns
    ws.Columns("A:G").AutoFit

    MsgBox reportMonth & " report formatted successfully."

End Sub
Walk through what each block does: the InputBox captures the month name and stores it in reportMonth; lastRow finds the last data row dynamically so the macro works regardless of how many rows the export contains; the header range is formatted directly without .Select; the Amount column gets a currency number format using a string like "G3:G" & lastRow to build the address dynamically; a totals row is appended with a SUM formula that also builds its range dynamically; finally AutoFit tidies the column widths and MsgBox confirms success.
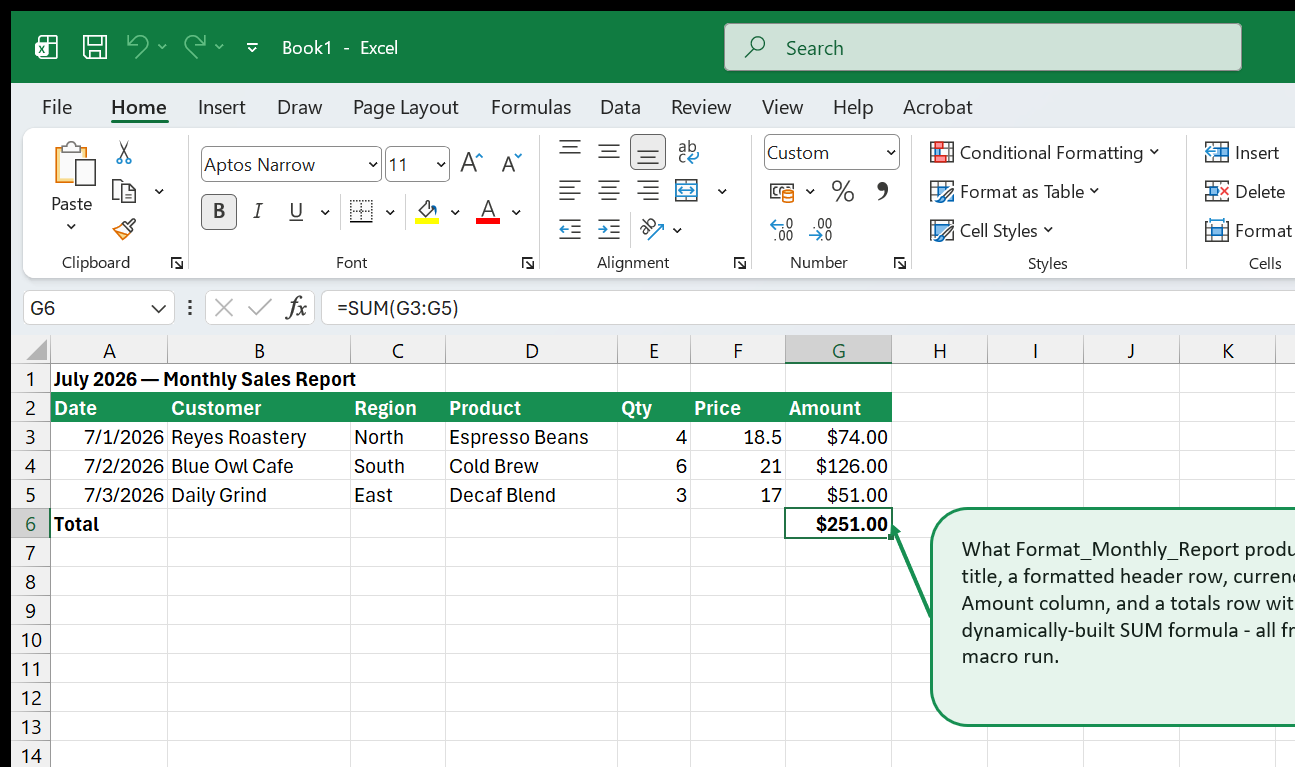
The formula written by the macro uses standard Excel syntax:
=SUM(G3:G101)Running this macro on any monthly export — whether it has 50 rows or 500 — produces the same clean output because nothing is hardcoded except the column letters.
Common Pitfalls
Not saving as .xlsm. The single most common reason a macro disappears: the workbook was saved as .xlsx. Always check the file extension. If a workbook was accidentally saved as .xlsx and the macros are gone, they cannot be recovered — they were stripped on save with no undo available across that file save boundary.
Forgetting Option Explicit. Add Option Explicit as the very first line of every module. This forces you to declare every variable with Dim before using it. Without it, a typo in a variable name — reprotMonth instead of reportMonth — creates a brand-new empty variable silently instead of throwing an error. With Option Explicit, the typo stops the macro immediately and tells you which variable is undeclared.
Hardcoded row counts. Range("A2:A500") works until the data has 501 rows. Use the Cells(Rows.Count, 1).End(xlUp).Row pattern instead — it adapts to whatever is actually on the sheet.
Macros that leave the cursor somewhere unexpected. Recorded macros often end with whatever cell happened to be selected when you stopped recording. Add Application.CutCopyMode = False if you used Copy/Paste, and consider ending with Range("A1").Select to return the cursor to a predictable location.
Macro security warnings. Excel blocks macros by default when opening files from the internet or email. If your .xlsm file opens with a yellow security bar saying macros are disabled, click Enable Content — or adjust Developer → Macro Security to trust files from specific locations. Leaving macros permanently disabled for all files is too restrictive; leaving them permanently enabled without any check is too permissive. The middle setting — disable macros with notification — is the right default for most people.
Unhandled errors crashing silently. If a macro errors halfway through, it stops mid-execution and can leave the workbook in an inconsistent state. Wrapping key operations in On Error GoTo error handlers is the robust approach; at minimum, add On Error Resume Next only for specific lines you know might fail (like deleting a sheet that might not exist), not as a blanket suppressor for the whole macro.
Quick Reference
| Task | VBA |
|---|---|
| Select a range | Range("A1:G1").Select |
| Set a cell value | Range("A1").Value = "Total" |
| Set a cell formula | Range("G102").Formula = "=SUM(G2:G101)" |
| Apply bold | Range("A1").Font.Bold = True |
| Set background color | Range("A1").Interior.Color = RGB(31, 73, 125) |
| Set number format | Range("G2:G101").NumberFormat = "$#,##0.00" |
| Find last used row in column A | Cells(Rows.Count, 1).End(xlUp).Row |
| Loop through rows 2 to lastRow | For i = 2 To lastRow ... Next i |
| Loop through every cell in a range | For Each cell In Range("A2:A50") ... Next cell |
| Show a message | MsgBox "Done." |
| Ask yes/no | MsgBox "Continue?", vbYesNo |
| Get input from the user | InputBox("Enter month:") |
| Autofit column widths | Columns("A:G").AutoFit |
| Reference the active sheet | ActiveSheet or Set ws = ActiveSheet |
| Reference a sheet by name | Worksheets("Summary") |
| Open the Macro dialog | Alt+F8 |
| Open the VBA Editor | Alt+F11 |
| Stop a running macro | Escape or Ctrl+Break |
Where to Go Next
- Excel Intermediate Skills is the natural next step — it covers array formulas, XLOOKUP, named ranges, and data validation techniques that combine well with macros in the same workbook.
- Excel Shortcuts Handbook is worth keeping open while you build macros — knowing keyboard shortcuts makes recording cleaner and reduces the noise of unnecessary mouse clicks in recorded code.
- Excel Charts & Data Visualization covers how to build charts that macros can control — a common pattern is a macro that refreshes the source data, reformats the sheet, and updates chart titles in one pass.
- Browse the VBA & Macros topic for deeper coverage: working with multiple sheets, error handling, UserForms, and connecting Excel to other Office applications.
Want a bigger export to practice Format_Monthly_Report on? Download PivotTable practice: sales transactions - 300 rows of realistic sales data, plenty large enough to feel the difference between a hardcoded range and Cells(Rows.Count, 1).End(xlUp).Row.
That's the whole book. Keep the PDF for offline reading.
Download PDF


